Project Liv Arena – Instructions for Using the Scoreboard System
Project Liv Arena Football Stadium
Instructions for using the scoreboard system
Up-to-date instructions for the sports available for use during matches:
Football
General instructions for media usage in the Jidoka scoreboard system.
The media shown on the scoreboard (team names and logos, advertisements, etc.) must be uploaded to the scoreboard system before the match via USB stick. The media is supplied on the stick to the control tablet, which then transfers the material to the scoreboard.
In case of problems, please contact support@jidoka.fi.
File requirements
Image files: .jpg, .jpeg yes .PNG
Video files: .MP4
Audio files: .MP3 yes .wav
The scoreboard's main display size is 480 x 296 px. This should be taken into account when preparing full-screen media.
The leaderboard system also has an additional display for results, the resolution of which is 480×96 px. This display shows only print information.
Matchday advertising sizesrecommendation 1920 x 1080 px (Aspect ratio 16:9).
Log files: minimum size 400 x 400 px (aspect ratio 1:1).
Video file resolution is a maximum of FullHD, meaning 1920×1080. The video bitrate should be limited 5000 kbit/s.
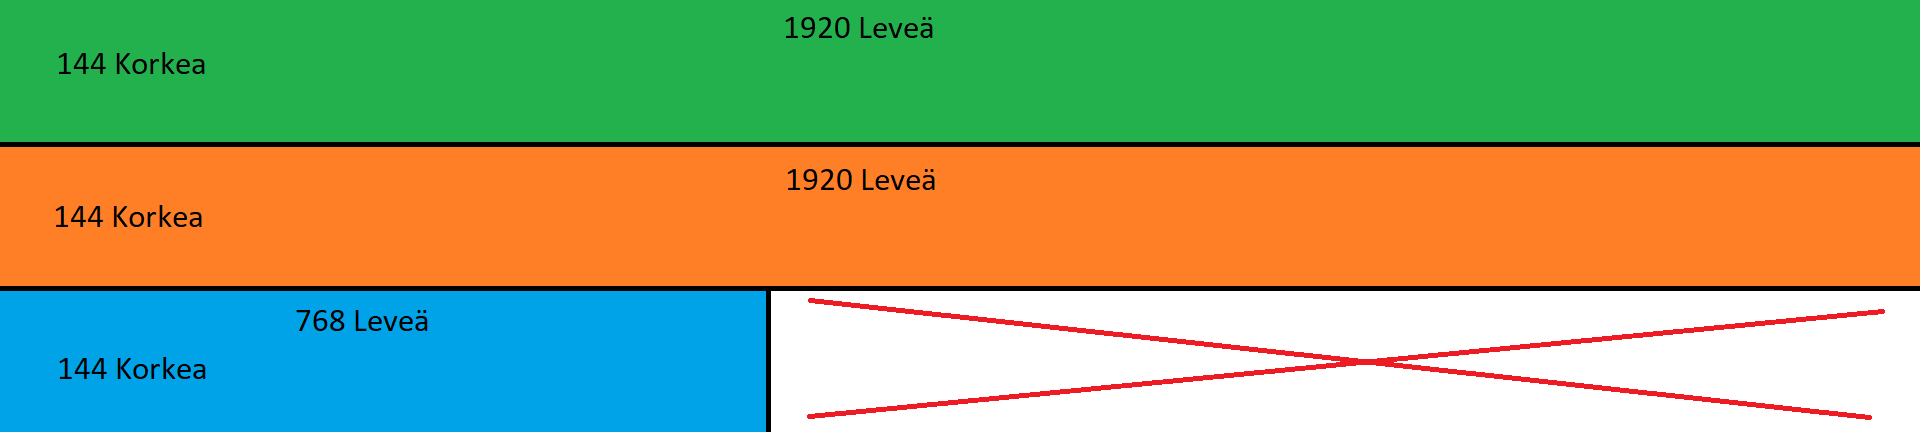
The perimeter display resolution is 4608×144 and there are 2 of these, one on each side of the cascade line. The material is being created 1920×432 px) I create three lines of a file, from which the video processor drives it to the LED perimeter modules. Below is an illustrative image of how the perimeter material should be created. The same applies to the video.
USB stick pre-setup
Create a folder named dsbController on the USB stick and subfolders within this folder ad, goal, guest, home and media.
https://jidoka.fi/wp-content/uploads/2021/10/menu.png
advertisement in-game advertisements which repeat in the scoreboard advertising space
Subfolders must be created in the ad-folder for your displays:
- Perimeter materials created for the perimeter during the match for automatically changing advertisements
- Main - in the folder for automatically rotating ads in the middle of the main dashboard
goal: A video or audio that can be manually replayed in the scoring situation.
If the subfolder contains both video and audio files, prioritise the video files. goal If the folder contains multiple files, by pressing the ”Goal video” and ”Goal song” buttons, the playback will start random video (if imported) or (audio) if imported. Files can be named freely but must be in mp4 or mp3 format.
Subfolders must be created in the goal folder for your displays:
-
- Perimeter materials created for the perimeter during the match for automatically changing advertisements
- Main - in the folder for automatically rotating ads in the middle of the main dashboard
Guest. Away team name and logo
- Logo on guestimage file named
- The name is a .txt-formatted text file with the team name on the first line.
https://jidoka.fi/wp-content/uploads/2021/10/menu3-kopio.png
home: Home team name and logo
- content as in the guest folder, but the logo is homeimage file named.
https://jidoka.fi/wp-content/uploads/2021/10/menu4-kopio.png
media manually repeatable content
- ”Image, video, and audio files played with the ”Show media" function
- Image and video files are played in full screen on the scoreboard
-
Subfolders must be created in the media folder for your monitors:
- Perimeter - Material created in the folder for the perimeter, which will be replicated across the entire screen.
- Main - Folder created for the main dashboard material to be displayed full screen
VX600 Pro
The up-to-date user manual for the VX600 Pro video processor/controller can be found at https://oss.novastar.tech/uploads/2025/04/VX-Pro-Series-All-in-One-Controller-User-Manual-V1.1.0.pdf.
Changing the input source on a large screen
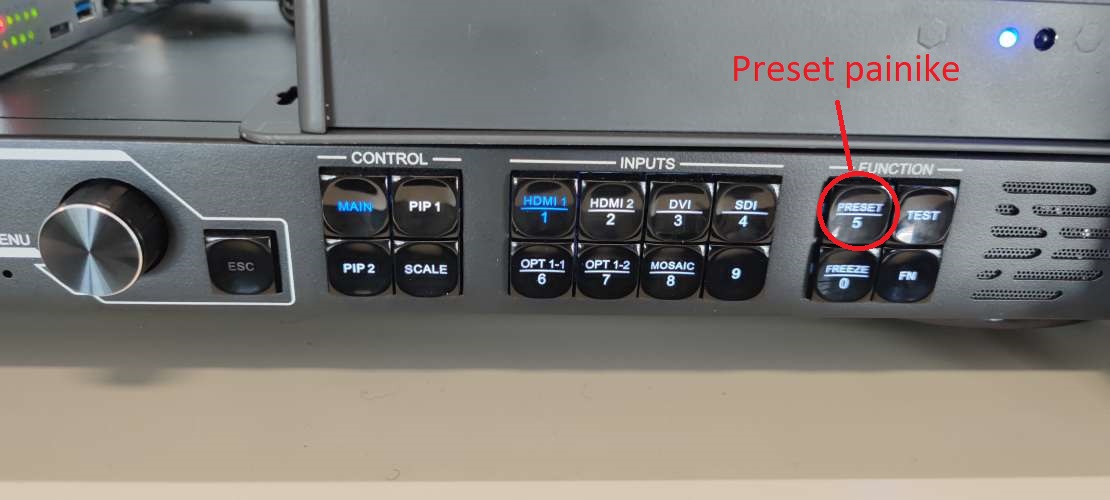
To display an image from an external source, the VX600 has a built-in feature. ”preset” which to change to when using an external source via HDMI.
The device has the following presets ready:
- Preset 1 – For the shooting target
- Preset 3 – For external HDMI
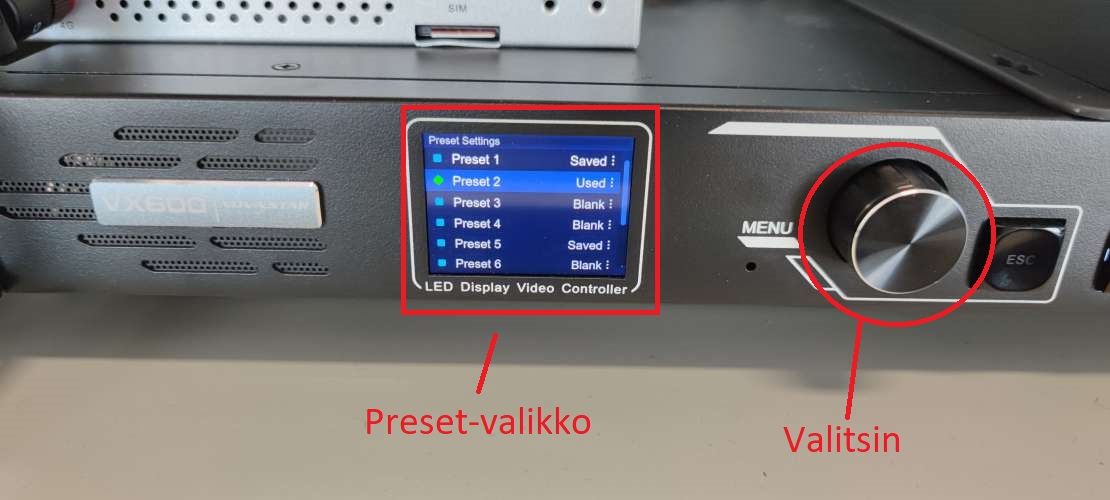
Connect the HDMI cable to the desired source and then press ”Preset” a button that opens the menu. Select ”Preset 2” by rotating the dial on the right side of the screen and pressing the dial in. In the new dialogue, press ”Load” by pressing the button again. The image has now been changed on the screen. The preset also changes the audio source, so the sound will come from the device connected via the HDMI cable.
To return the image to the scoreboard, press ”Preset” the button and select ”Preset 1” by rotating the selector to the correct position and pressing it down. In the dialogue that opens ”Load” and press the selector, which will change the image back to the scoreboard.
Note: If you do not switch back to ”Preset 1” for the scoreboard when finishing, the image will be displayed incorrectly on the screen.
In problem situations
If you encounter problems with the scoreboard, please proceed as follows:
- Please check that the connection ball visible in the top right corner of the controller is green
- If red, check that all Ethernet cables are connected to the correct ports as per the images in the previous section
- If the light is green but the system isn’t working, try restarting the entire scoreboard system by clicking ”Restart System” in the menu at the top left. This will restart the system and take approximately 2 minutes.
- If you are experiencing sound issues, please check that the XLR cable coming from the scoreboard control cabinet is connected to the stadium’s sound system and that the system settings are correct.
- When using the scoreboard image, it is important to ensure that the correct Preset (Preset 1) is being used on the VX600 Pro device, which has been correctly configured for scoreboard use.
- If these don't help, send a message. support@jidoka.fi and write a description of the problem, and when the problem occurred (date and time). With this information, resolving the problem will be easier.