Myyrmäki Ice Hall – Instructions for using the scoreboard system
Instructions for using the scoreboard system
See the current ice hockey instructions for matches from here.
You can find the current ringette usage instructions for during matches at from here.
This page contains the preliminary arrangements required for the use of the Jidokan scoreboard system. If you wish to modify the files displayed during a match, the necessary files must be downloaded in advance. before the match For the USB stick, from which the match content is transferred to the scoreboard via the control tablet.
File requirements
Main display resolution: 1664 x 936 px
Images to display: jpg, jpeg and PNG
Media files MP4
Audio files MP3 and wav
Advertisement file formats jpg, JPEG, PNG and MP4
Image and video file resolution: 1920 x 1080 pixels (16:9 aspect ratio)
Logo files PNG, JPEG or jpg, minimum 400 x 400 pixels (1:1 ratio). If the logo image has transparent parts, you must use PNGfile type.
USB stick pre-setup
The USB stick must be formatted either FAT32 or NTFS-to the file system. We recommend NTFS.
Create a folder on the USB stick called dsbController and subfolders inside this folder ad, goal, guest, home and Media. File sstyles With this, you can edit the scoreboard styles.
https://jidoka.fi/wp-content/uploads/2025/02/uusi_dsbcontroller.png
- advertisement Advertisements displayed on the scoreboard during the game, which can be images and videos. If you place multiple images and/or videos in a folder, they will all be displayed sequentially on the screen.
https://jidoka.fi/wp-content/uploads/2021/10/menuu1-kopio.png
- goal The video shown with the ”GOAL VIDEO” button on the control tablet. Multiple videos can be imported into the system in the folder and played. random Video of a button being pressed.
https://jidoka.fi/wp-content/uploads/2021/10/menu2-kopio.png
Note!
Two game details: For two games, team logos cannot be displayed on screen due to space constraints.
- Guest. The away team's logo and name. The logo is an image named ”guest” and the name is a text file in .txt format, with the team name on the first line. The text file name can be name.txt or guest.txt. If the two-game mode is to be used, the name of the second away team can be name2.txt or guest2.txt.
https://jidoka.fi/wp-content/uploads/2021/10/menu3-kopio.png
- home Content corresponding to the guest folder, but with the logo filename being an image file named home. The text file name can be name.txt or home.txt. If playing a two-player game, the second home team's name can be name2.txt or home2.txt.
https://jidoka.fi/wp-content/uploads/2021/10/menu4-kopio.png
- mediaVideo, image, and audio files played via the video, image, and audio lists that open from the ”Show Media” options in the control tablet's menu. The default buzzer can be replaced with an audio file named horn.mp3 as the scoreboard buzzer. If the file is not in the folder, the system will use the default sound.
https://jidoka.fi/wp-content/uploads/2021/10/menu5-kopio.png
Automated announcements and team sheets from the Ice Hockey Federation's results service
The Myyrmäki scoreboard system allows for the use of automatic announcements as well as uploading match line-ups, team names, and team logos directly from the Finnish Ice Hockey Federation's results service. Below is a printable link for more detailed instructions on their use.
Automatic announcements and ice hockey federation results servicehttps://jidoka.fi/wp-content/uploads/2023/04/nokia_styls-196×300.png
Changing the input source on a large screen
To display an image from an external source, the VX600 has a built-in feature. ”preset” which to change to when using an external source via HDMI.
The device has the following presets ready:
- Preset 1 – For the scoreboard
- Preset 3 – For external HDMI
- Preset 5 – Print track whose centre is external HDMI
Connect the HDMI cable to the desired source and then press ”Preset” a button that opens the menu. Select ”Preset 2” by rotating the dial on the right side of the screen and pressing the dial in. In the new dialogue, press ”Load” by pressing the button again. The image has now been changed on the screen. The preset also changes the audio source, so the sound will come from the device connected via the HDMI cable.
To return the image to the scoreboard, press ”Preset” the button and select ”Preset 1” by rotating the selector to the correct position and pressing it down. In the dialogue that opens ”Load” and press the selector, which will change the image back to the scoreboard.
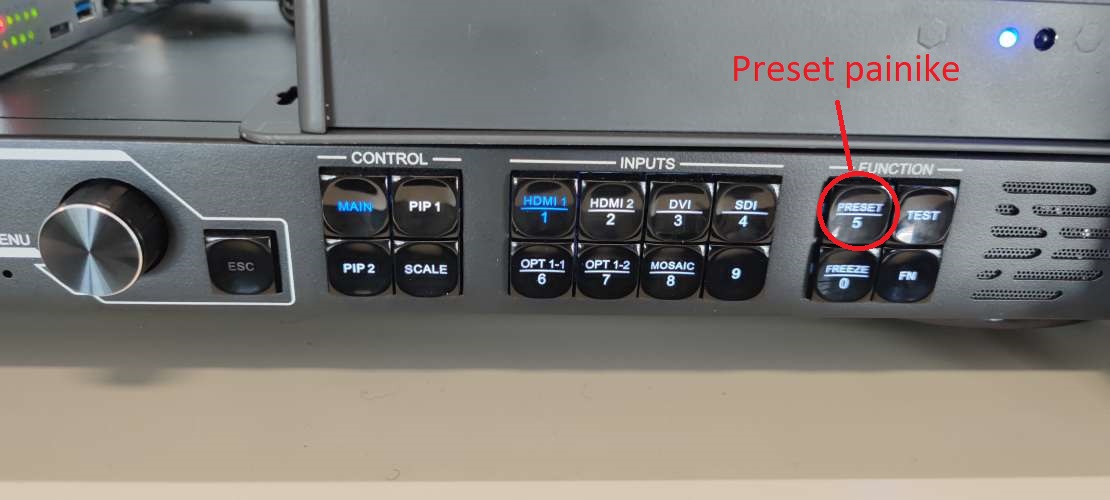
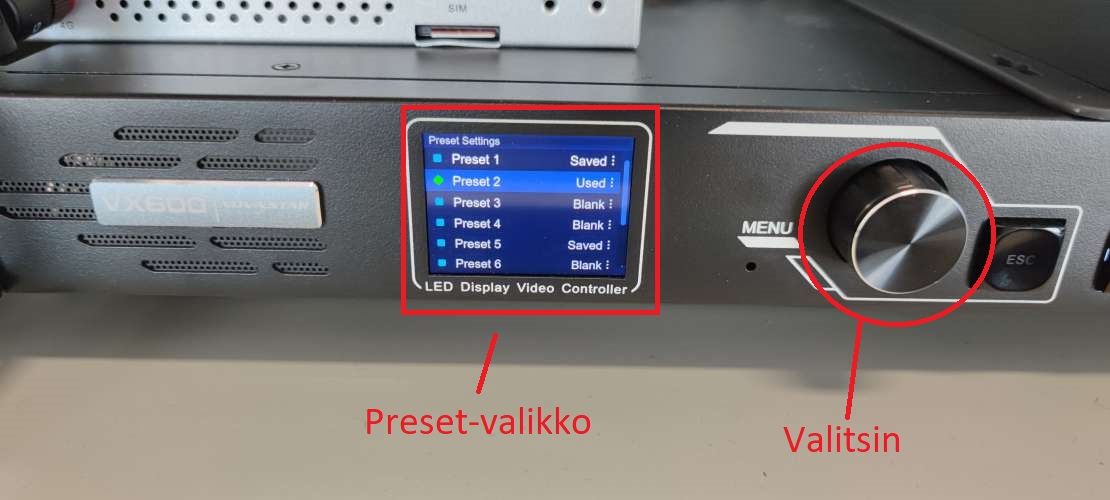
Note: If you do not switch back to ”Preset 1” for the scoreboard when finishing, the image will be displayed incorrectly on the screen.
In problem situations
If you encounter problems with the scoreboard, please proceed as follows:
- Please check that the connection ball visible in the top right corner of the controller is green
- If red, check that all Ethernet cables are connected to the correct ports as per the images in the previous section
- If the light is green but the system isn’t working, try restarting the entire scoreboard system by clicking ”Restart System” in the menu at the top left. This will restart the system and take approximately 2 minutes.
- If you are experiencing sound issues, please check that the XLR cable coming from the scoreboard control cabinet is connected to the stadium’s sound system and that the system settings are correct.
- When using the scoreboard image, it is important to ensure that the correct Preset (Preset 1) is being used on the VX600 Pro device, which has been correctly configured for scoreboard use.
- If these don't help, send a message. support@jidoka.fi and write a description of the problem, and when the problem occurred (date and time). With this information, resolving the problem will be easier.